Pumpkin Pie Bars + 5 Not A Pie Desserts For Thanksgiving!


ppb019

We threw a “pre-holiday” party last weekend.  Local friends came over for drinks and conversation sans children.  Chatting and drinking with friends we only see at soccer games, school pick-ups/drop offs and fundraisers felt like a luxury.  A luxury? Yes.  Most of the time we see each other harried, running off to the next activity, chatting briefly before a little person tugs on our arm, it’s time to go…again.  As if we are on a treadmill without a stop button, we just keep going.  Saturday night we stopped.  We drank and laughed and ate.

Before long friends left to relieve sitters.  We happily enjoyed our final sips and bites before taking on the mess in our kitchen.  I didn’t mind cleaning up this mess.  There is something beautiful about a post party mess, as if, bits of people are left behind, their energy still enveloping the room.  After we cleaned the last glass, swept the last crumb and recycled the final beer bottle; we collapsed into bed.  It was a perfectly unusual Saturday night for me and Bubba.

ppb0038

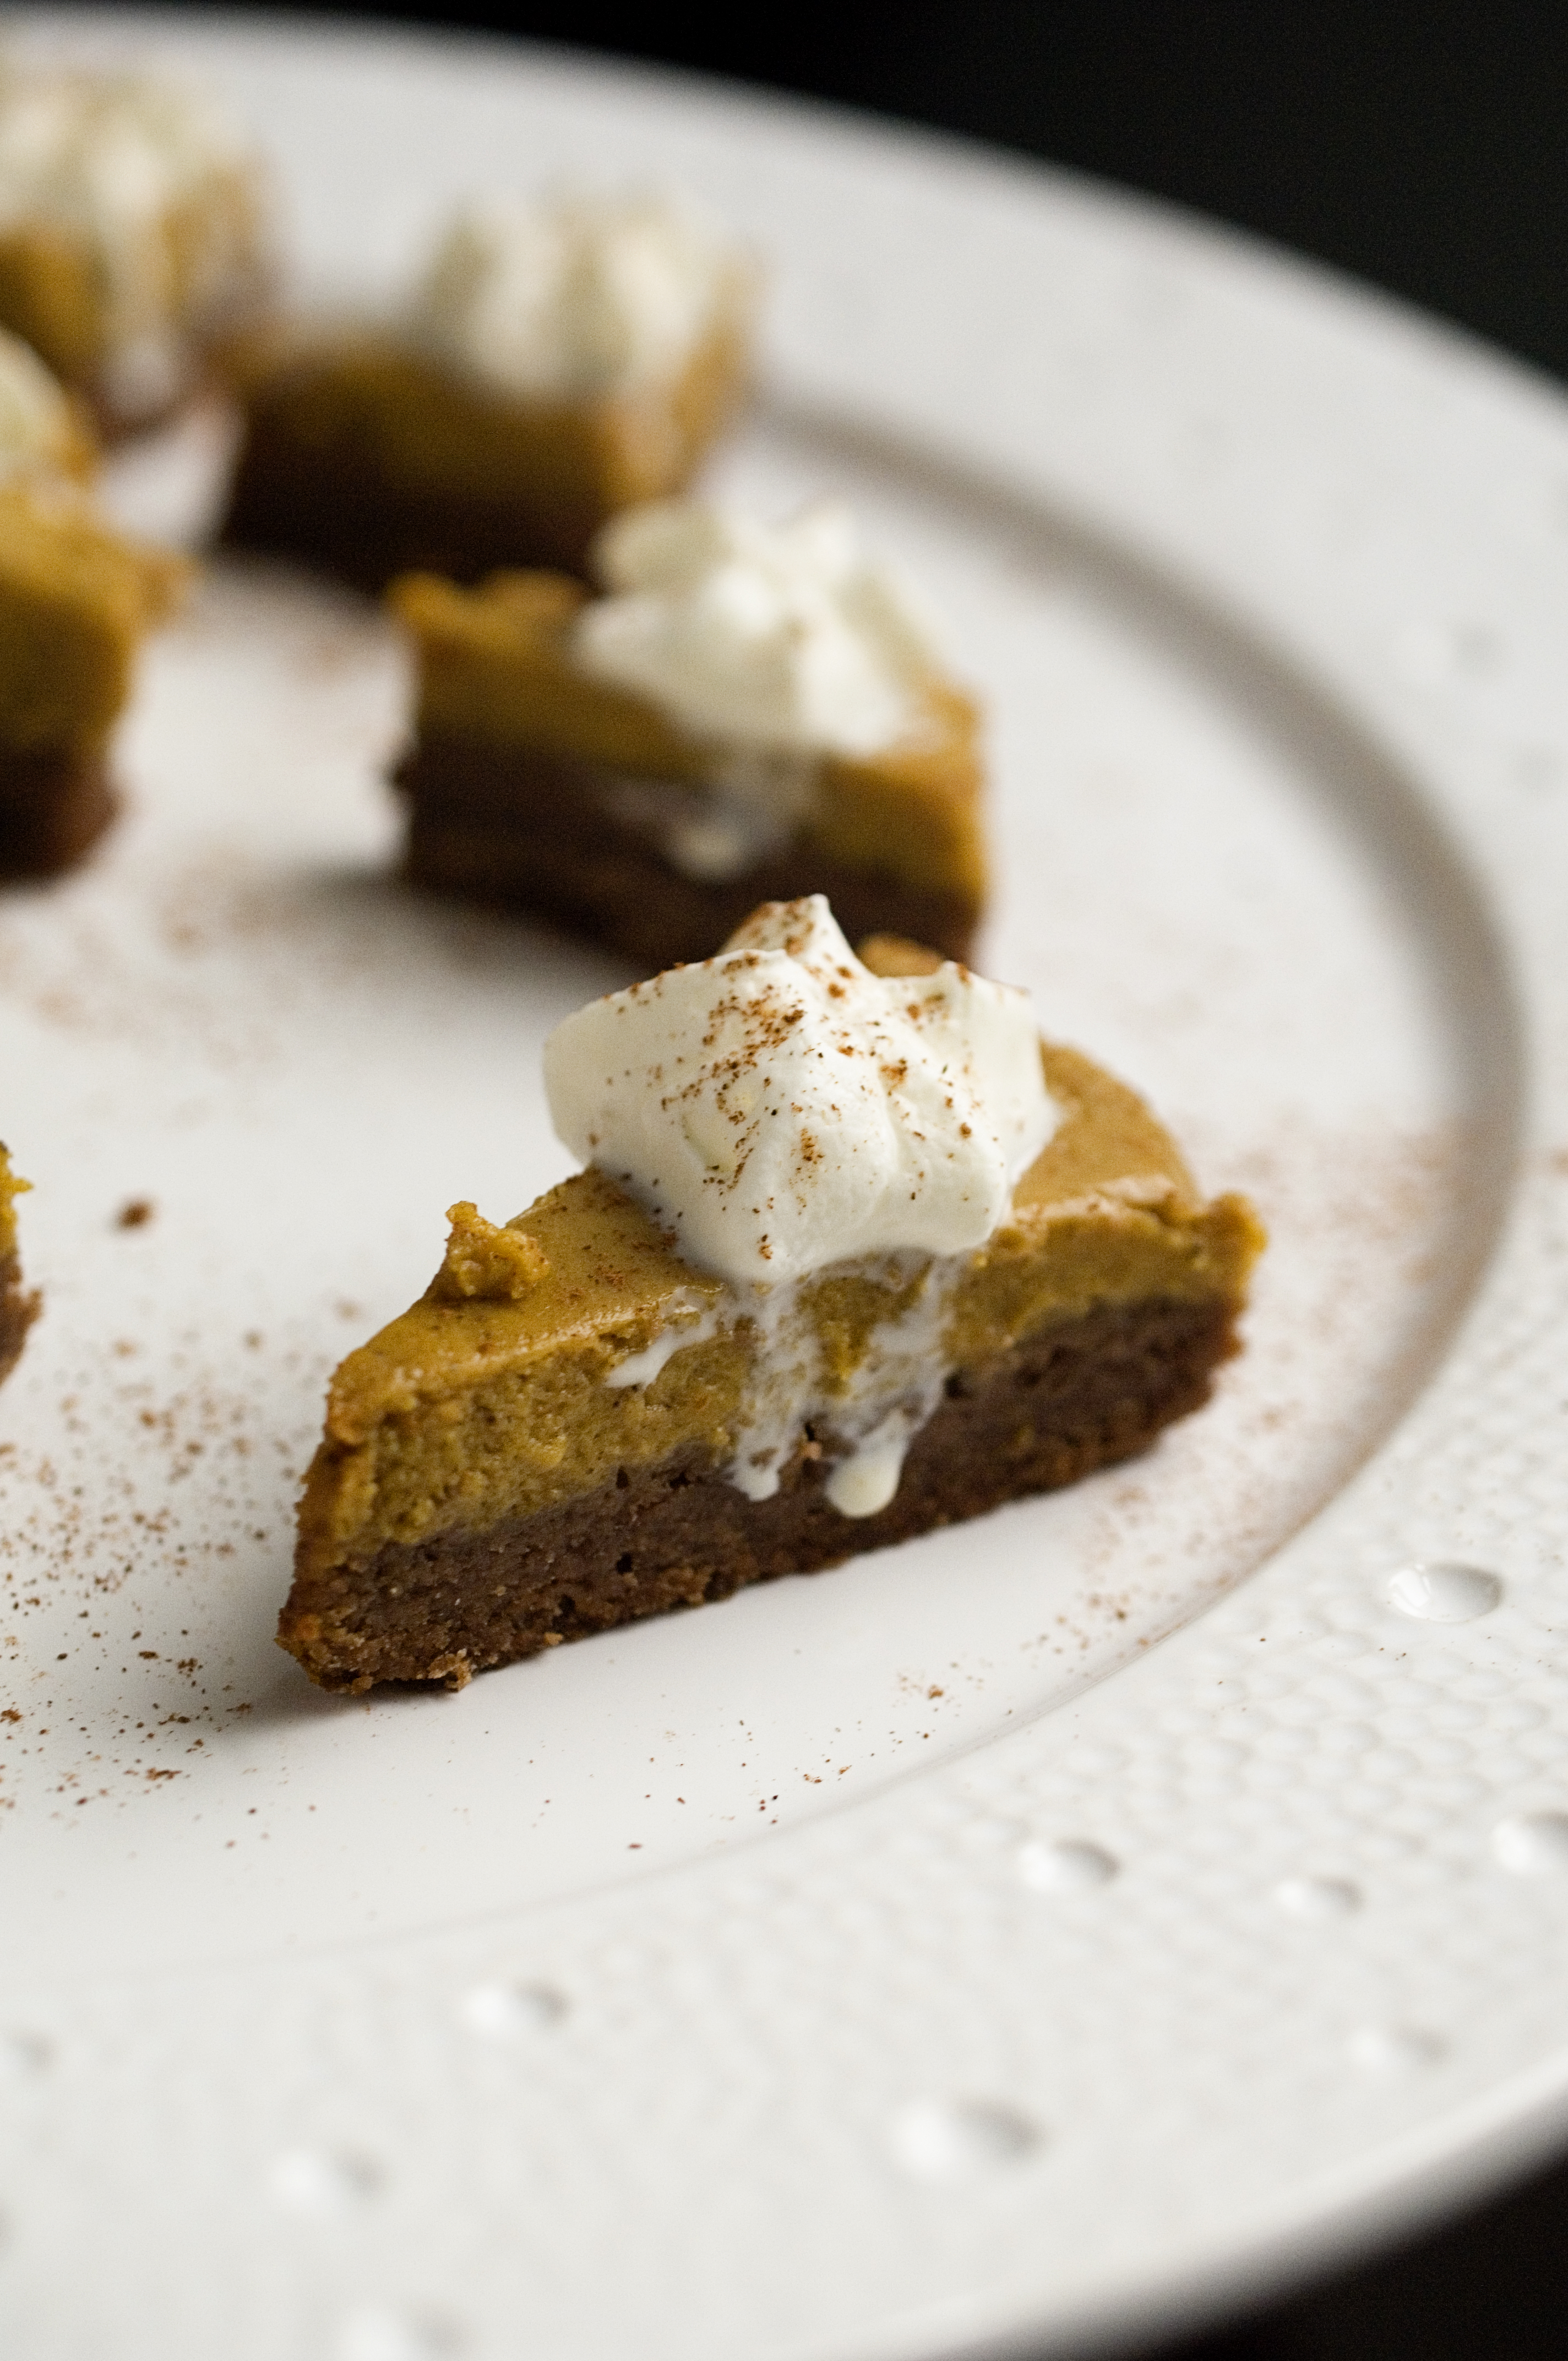
Pumpkin Pie Bars with Baked Press In Chocolate Crust

I made these bars for our “pre-holiday” party. The bars are similar to a traditional pumpkin pie, spicy and comforting, but with a slight twist: the crust is chocolate and requires no rolling!  This simple, press-in chocolate crust is much easier to make than a traditional pie crust, so you won’t feel inclined to tear your hair out or chug a bottle of Malbec!  Also, the whole dessert can be made up to two days in advance! 

Makes 12 large bars or 24 mini bars

recipe adapted from Food & Wine

Ingredients for Baked Pressed In Chocolate Crust

2 1/2 sticks of cold unsalted butter, cut into cubes

1/4 cup + 2 tablespoons light brown sugar

1/4 cup + 2 tablespoons granulated sugar

2 1/2 cups all-purpose flour, sifted

1/2 teaspoon kosher salt

1/4 cup unsweetened cocoa powder, sifted

1 tablespoon of water

Directions For Crust:

Pre-heat your oven to 350°F. Line a 9-by-13-inch metal baking pan with parchment paper, leaving about 2 inches of overhang on the long sides. Set aside.

Using a stand mixer fitted with the paddle attachment, cream the butter and sugars at medium speed for a few minutes, 2-3.   With the mixer on low-speed, beat in the sifted flour, unsweetened cocoa powder and salt.

Place the dough in your prepared pan and press it evenly over the bottom.  (The original recipe suggests covering the dough with plastic wrap and pressing with the bottom of a measuring cup.  This sounds like a great idea, but I forgot to do it. Your fingers will work well too!)  Refrigerate the dough in the pan until firm.

Bake the crust for about 30 minutes.   The cocoa powder will make it difficult to tell if it is cooked perfectly, so be sure to remove the pan from the oven at 30 minutes or when the surface looks dry.  Allow to cool completely before filling.  While the crust cools, prepare your pumpkin pie filling.

Ingredients for Pumpkin Pie Filling

1/4 cup dark brown sugar

1/2 cup granulated sugar

1 teaspoon cinnamon + more for dusting

1/4 teaspoon ground cloves

1/4 teaspoon ground ginger

1/4 teaspoon ground cardamom

1/4 teaspoon nutmeg

1/4 teaspoon salt

1/2 teaspoon vanilla

2 large eggs

One 15-ounce can pure pumpkin puree

One 12-ounce can evaporated milk

Prepared whipped cream

Directions:

Preheat your oven to 425F.  In a small bowl whisk together the sugars, all of the spices and salt. Set aside.  In a medium bowl whisk together your eggs.  Whisk the sugar mixture into the egg mixture.  Next, add your pumpkin puree, evaporated milk and vanilla extract.  Whisk until very smooth.

Pour the filling into the crust and bake for about 10 minutes.  Lower the temperature to 350F and bake for another 25-30 minutes or until the filling is set.  It should not jiggle!

Transfer the pan to a wire rack and allow to cool completely.  Cut into bars, large or mini, and serve with whipped cream and a dusting of cinnamon.

I suggest making the bars a day head and storing them in an air-tight container in the refrigerator.  The flavors are more pronounced a day later.  Serve them chilled or at room temperature.  Also, add the whipped cream just before serving or have guests add their own whipped cream.  Enjoy!

5 Not Pie Desserts For Thanksgiving

Looking for a lighter pumpkin cake to serve after the big holiday meal?  Head to Food 52 for Alice Medrich’s Lighter Pumpkin Cake recipe.

Tired of pies and cakes?  Try a crisp.  A pumpkin pear crisp! Bon Appetit has the recipe for you.  Check it out!

Not worried about eating all the calories you need for a week in a day?  Then head to Sacramento Street for Amanda Fredrickson’s Pumpkin Cheesecake Squares with Toasted Marshmallow Frosting.  Wow!  I must make these!

After a big, heavy meal it is nice to have a light and refreshing dessert…sometimes.  Martha has a recipe for cranberry-port sorbet that sounds like the perfect palate cleanser.

I’ve mentioned Zoe’s maple cream snickerdoodle bars before and I am mentioning them again.  I am obsessed and need to make them asap!


Pumpkin Oatmeal Cake with Maple Cream Cheese Icing + 5 Easy Halloween Dessert Links!

_KH10017

“I may not have gone where I intended to go, but I think I’ve ended up where I needed to be.” Douglas Adams

Happy accident. Serendipity. Stroke of luck.  This is how my pumpkin oatmeal cake came to be.  Like so many other things in my life I chose a path hoping for a certain outcome, made a couple of gut feeling choices and luckily the result turned out great.  We received a sugar pumpkin in our CSA last week.  What the hell am I going to do with this thing?  I’ve never roasted a pumpkin before because the can stuff suits me just fine.  Why mess with easy and delicious?  Choices are tough.  I could put the pumpkin on our porch and let the squirrels have it, use a can of pumpkin puree that’s been sitting in my pantry for two years or roast a farm fresh sugar pumpkin.  I went for it and roasted the pumpkin. You never know where one decision might lead.

_KH10004

Well my choice lead me to Alton Brown’s recipe for pumpkin puree.  I cut the sweet little pumpkin in half with my best knife.  (He suggests using a cleaver, but I don’t own one, I’m not there…yet.)  I scooped out the seeds and let the kids play with the goo.  They loved it and they made a huge mess, but they were occupied.  Hooray!  I sprinkled the flesh with kosher salt and roasted each half, flesh side down, for about 30 minutes.  My house smelled like pure, earthy pumpkin.  Once the pumpkin was fork tender, I removed it from the oven and allowed it to cool for an hour.  After a quick hour, I scooped up the flesh and spooned it into my food processor; minutes later I had fresh pumpkin puree. Easy!

_KH10028

I set out to make Martha’s Pumpkin Cookies with Brown Butter Icing.  Her recipe called for canned, solid pumpkin puree, and my puree was anything but solid.  It was more like stage 2 baby food, a little thick, but not solid.  Once I noticed how watery the batter was, I decided to add 2 cups of oatmeal for a little health and chewiness; still planning on cookies not a cake.  Then I noticed the time.  The kids were getting restless and the baby would be up from his nap soon.  Bars! The quick version of a cookie!  I had a ton of batter so I chose a 9×13 pan.  I poured the batter into my prepared pan and popped it in the oven. Fifteen minutes later, I peeked through the oven door and saw the batter rising higher than expected, slowly forming a golden brown pumpkin cake.   I expected bars.  I wanted moist, perfectly spiced, slightly chewy pumpkin bars.  My choices lead to a new dessert, a new plan.

Once the cake cooked and cooled, I took a little piece from the corner.  Moist, sweet and nicely spiced…it was good?!  Cake needs frosting or icing.  I love maple and pumpkin together, so I made an easy maple cream cheese icing.  I attempted to artistically drizzle the icing all over the cake, but it looked more like my 4-year-old got a hold of the icing.  I smoothed over the icing and sprinkled it with a bit of cinnamon.  I cut myself a piece of cake, took a big bite and enjoyed my happy accident.

Pumpkin Oatmeal Cake with Maple Cream Cheese Icing

This cake is moist, dense and perfectly sweet.  The fresh pumpkin makes a difference you can taste: earthy and subtly sweet.  The oatmeal adds a surprising texture to the cake.  The maple cream cheese icing pairs well with the pumpkin and can be easily doubled if you want a thick layer of icing.  This is an easy dessert for the upcoming holiday season. Enjoy!

recipe adapted from Martha Stewart and Epicurious

serves 10-12

Ingredients for Cake:

2 cups unbleached, all-purpose flour

3/4 cups white whole wheat flour

1 teaspoon baking powder

1 teaspoon baking soda

1 1/4 teaspoons kosher salt

1 1/2 teaspoons ground cinnamon

1 1/4 teaspoons ground ginger

3/4 teaspoon ground nutmeg

pinch of ground cloves

2 cups of old fashion oats

3/4 cup (1 1/2 sticks) unsalted butter, softened

2 cups packed light-brown sugar

2 large eggs

1 1/2 cups pumpkin puree (not pumpkin pie filling)

3/4 cup evaporated milk

1 teaspoon pure vanilla extract

Directions for cake:

Pre-heat your oven to 350F. Line a 13×9 metal baking pan with parchment paper.  Lightly, grease and flour the parchment paper and set aside.

In a medium bowl whisk together flours, baking powder, baking soda, salt, cinnamon, ginger, nutmeg, cloves and oatmeal; set aside.

Using a stand mixer fitted with a paddle attachment, cream the butter and brown sugar on medium speed until light and fluffy, about 3-5 minutes, scraping the sides of the bowl half way through. Add the eggs, one at a time, mixing thoroughly after each addition.  Reduce the speed to low and add the pumpkin, evaporated milk and vanilla.  Mix until well combined.  (**The batter may separate at this point, but don’t worry it will be fine once you add the dry ingredients.**)

Add the dry ingredients and mix until just combined. Pour the batter into your prepared pan and smooth out the top.  Bake for about 35-40 minutes or until a cake tester inserted in the middle comes out clean or the cake springs back when lightly touched.  Allow the cake to cool completely in the pan on a wire rack.  Once cool, carefully remove the cake.  Remove the parchment paper and decorate the cake with maple cream cheese icing and serve.  The cake is best the day it is made, but tastes great the next day too.  If you have any cake left, store it at room temperature in an air-tight container.  Enjoy!

Maple Cream Cheese Icing

makes about 2 cups but can easily be doubled

Ingredients:

1 8-ounce packages cream cheese, at room temperature

1/2 stick unsalted butter, at room temperature

3/4 cups powdered sugar, sifted

1/4 cup pure maple syrup

3/4 teaspoons vanilla extract

pinch of salt

Directions:

Using a stand mixer beat the cream cheese and butter until smooth. Add the sifted sugar, maple syrup, vanilla and pinch of salt.  Beat until very smooth and decorate your cake.

5 Easy Halloween Dessert Links!

Need a quick and easy finger food dessert for your Halloween party? Head to Willow Bird baking for her maple cream snickerdoodle bars.  I must make these!

Offer some nut-free Halloween treats this year!  The kitchen has a list of 5 nut-free Halloween treats that both kids and adults will love. Check it out!

If you love Halloween Oreos try making your own!  Better yet, try my recipe.  So good!

I love caramel.  Two Red Bowl’s recipe for apple cider crème fraiche caramels has me motivated to attempt candy making again!

Have time to make candy and want to keep it sorta healthy on Halloween?  Head to Edible Perspective for chocolate pumpkin almond butter cups.  Yes please!